Sunday, May 24, 2020

Chapter 7>Undoing the Woodpecker's Work

Step 7-Covering up the console holes with Black Starboard…

This was really sobering….I got the table saw, a fine blade, and another gallon of Acetone. I went and cut the starboard. The sizing was well done then I looked for screws to install it. I settled on some #8 and afterward I felt they were too large. I also forgot to use 5200 on the back and I could have beveled the piece (I need a router table). In a nutshell I wasn’t happy at all after all the work and expense I’ve put into it. Very mediocre. I did not continue and perhaps I will make another attempt tomorrow. This morning I went out and got #6-1” stainless steel screws for the top. I also need to cut a recess so the screws sit low.


This really bummed me out but I am confident I will take it apart and fix it all.

-This post will be updated in the future.


Chapte 6>Jack, Wheel and Trailer Painting


Step 6-Trailer Jack and Wheel: 5/5-Yesterday I received the trailer jack, I had received the wheel on Sunday, and I went ahead and installed it. You may notice the old one was totally rusted. I went ahead and sanded the area down using the new detail sander (The Beast), the Dremel which worked quite well for the real tight spots and then finished it off with the pneumatic sander. That one did the trick! I was ready to paint it!. 

I got motivated and began to paint the front part of the trailer where the jack is located.
Step 7-Painting the front of the trailer and More….I was going to brush on the pint of Rust-Olem black paint but decided to use the Black Phantom paint instead. After all, I was going to only use it just to paint the lower unit fin. The last can I purchased I ended up giving it to my friend Art. That was over five years ago and I also have the Chromatic Primer. I had to unclog the can to make it work and once I did, it was as if I had just purchased it.  But before that I had to cut two locks I had secured the spare tire with.

I sanded down the area using my new Detail Sander (The Beast), the Dremel Tool which worked quite well and then finished it all off with the pneumatic sander.


 Afterward, I was a bit apprehensive about spray painting so close to the boat but made sure the wind was not blowing into the boat and covered the area with tape and newspaper. 


I've only used that can of primer once to just paint the scratched section of my lower unit and have had it for over six years. Once I thoroughly covered the areas I did not want to spray paint I went ahead and sprayed the primer on and then applied two coats of the Black Phantom spray paint. 


I used a pint of regular black paint and painted the front, then the Winch Stand, then the trailer body all the way to the tires on both sides! I finally ran out of paint and I did not expect that! The trailer looks great and it was relatively easy. The worst part of it was that I did not sand the old paint down, just cleaned it with Acetone. I have always seen a layer of yellow under the trailer’s black paint and always thought the trailer was made of fiberglass. It turned out that the yellow was actually the primer….who would have thought to paint an aluminum trailer BLACK!?


Although I did not do a thorough job the results are great! I purchased a can of primer and black topside paint and will be finishing once I take care of all the console work. I am leaving the trailer painting towards the end of the project so that I won't be standing on the trailer once I paint it.


So, it looks great but I can’t stand the condition that the winch is in, sooo…. I ordered a new one for 45$!!!
I hope this brings it all back to speed. Tomorrow I plan to attempt to lay down the gel coat and seal the prow. That’s what started this whole project in the first place. After that I want to wipe down the rust marks with the Muriatic acid, wash down the interior, wax it, and install the cutting boards and teak steps. I will not do the hatches till I get the spider web cracks and nicks that are in the coolers and under the seat. I am going to also do the big crack that is in the front of the boat and once I do that it’s time to tackle the electrical part that includes the lights, temperature, and fuel gauges….oh yeah...B.O.A.T=Bail Out Another Thousand-Tight Lines.....

Chapter 5>Nav Light

Step 5-Nav Light:

This is where it all started to get out of hand. I looked at the condition of the nav light and went ahead and ordered a 20$ new LED light. It arrived a few days later and it was beautiful and as a result, it encouraged me to go ahead and do more cosmetic work on the boat.


The Sun and seawater caused older light to calcify and dull.


This is the new LED light

So the next day after installing the light I went and purchased a table saw, fine blade, and portable wet-dry vacuum. I have also purchased or ordered a new detail sander, sanding discs for my orbital sander, Black Topside paint, mixing bowls (ripped off?) Muriatic acid, black topside paint, 1” brush,  the trailer jack and wheel, Dremel (so that I can cut out the “spider web” fractures), wool bonnets for the polisher, McGuire polishing system, black 1/4" starboard, Quicksilver Phantom paint for the lower unit, pneumatic sander, 2” sanding discs for the pneumatic sander, batteries for my drill and driver, (I almost gave them to my brother but realized the generic replacement batteries cost 32$ for two), more acetone, adapter for the vacuum, Silica to harden the Gelcoat (it arrived today) so that I could use it as a filler, more sandpaper sheets 400-1200 grit, and did I mention a new winch? Needless to say that I am feeling quite guilty and went ahead and took care of a number of Sandra's bills. I believe I’ve done my part but I am sleepless thinking of what would happen if I lost my job. By the same token I realize I don’t want to go back to work.

So, back to the boat….

Step 9-May 06> The Nav Light disconnects-A Step back: Yesterday I went to show how well the LED light worked and it didn’t turn on. Today I finally uninstalled it and found the ground wire had come loose. It is stuck inside the boat and there’s no way of getting it. You would think all I would have to do is pull the wire but it is put in such a crazy way that I don’t see any easy way of getting out of there. I am thinking of using some very thin long tweezers or a “flex claw”.

The next day I asked Sandra to help me and she came up with the idea to "lasso the wire with a string".  I didn’t think it would work but her persistence paid off and she was able, after considerable effort, to pick up the wire and take it out with a pair of needle-nose pliers. Afterward I secured it but decided I needed a rachet crimper for any future wiring and ordered one.


Chapter 4>Adjusting the Bimini

Step 4-Adjusting the Bimini Top

For years after the boat sank and I replaced the Bimini top with a used one, I felt the Bimini top was too wide and it was producing undue stress to the Bimini rail that sits on top of the gunwale. Well I finally went and decided to remedy this by cutting off 7” of the top of the main strut. I also went and cut 8” off the aft strut.


I figured I would find a piece of aluminum piping of about 1” in diameter for the ⅞” to go into. I went to two ACE hardware stores and no aluminum, well how about a piece that would go into the ⅞ and then bolt it down? Sure enough I had the pieces I cut off.

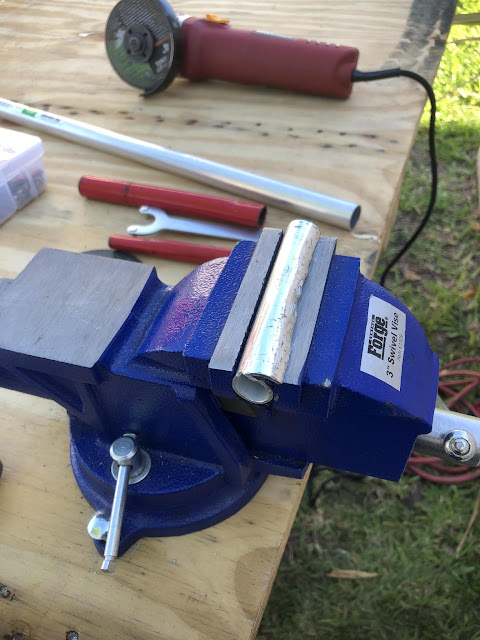
I locked them on my vise and used my grinder to cut a groove through the center, then I went and used the vise to squeeze the pieces together. It wasn’t thin enough so I hammered the lower on of the halves below the other and “rolled” it under the other half. I realized I should have made the groove cuts two blades wide.


The cut I made was way too narrow and I spend a lot of time adjusting the tube. I corrected on the next tube.

Afterward I inserted the reduced piece of tubing into the frame and went ahead and drilled a screw to each side to keep them in place.

The bimini now seems to lack a bit of tension and I think I can remedy this by shortening the supporting front struts. 


Chapter 3>Painting The Transom: Working with Gelcoat

Step 3-Painting the Transom:


Before Applying Gelcoat

After looking at at least six videos on YouTube I finally ordered and received the Total Boat Gelcoat, and blue tape. I also found I had a nice brush that I thought had been ruined but to my surprise, I used Acetone on it and it brought back it’s

flexibility!

There wasn’t much to the whole thing. I purposely overestimated the area to be 14 square feet, the quart size can of Gelcoat does 25 square feet. Where I totally messed up was adding the catalyst. I was supposed to be 7 drops per OUNCE!  I used 7 drops on the entire ½ pint. When I went to apply it, it came down as if I was adding water. I then somehow figured I had to put 40 drops to what was left, I figured I had about 7 ounces. The mixture hardened within a couple of minutes and regardless I splattered it on! The result is not pretty but I learned from this and I gave it a bit of sanding. It is not as nice as I would have liked it, I look like the “Marielito boats” that I see around but it will do, or will it? Like I wrote, I seemed to have gotten the bug and I want to see the boat as close to perfect as I can make it.


After Gelcoat

Although the results of the Gelcoat were far from what I would have wanted, I felt I learned enough and went ahead with the new Dremel and cut into a couple of spider web cracks and drill holes on the gunnel. In order to fix spider web cracks you are supposed to cut into them, make them wider, and expose the fiberglass. This way the Gelcoat will have something to adhere to. You also need to turn the Gelcoat into a paste and I received the silica hardener today. I will be testing filling up the cracks tomorrow. I learned that spider cracks are the result of the fiberglass flexing and the Gelcoat not...No more bouncing the boat off waves! I feel that if the Gelcoat is not flexible, why use it as a filler? There is another product that I am interested in trying once I dominate applying Gelcoat and it’s called Total Boat Thixo Flexible Epoxy Adhesive. It takes numerous steps to apply but I might try it in the future.

Chapter 2>Small, Messy Details

Step 2-The Recesses, Cutting Boards, and Teak Steps:

While working the hatches I removed the cutting boards that are mounted on the gunnel and found a mess. It was expected. Five years ago I removed them and found recesses that were used to hold bait, flies, hooks, weights, etc. Unfortunately by the time I removed them there were worms growing under the mess. Thankfully the worms never attacked the Gelcoat. I went ahead and cut pieces of starboard to fill up the void then applied 5200 on top. However for some reason the port side position “bled” a gunky looking fluid that dried up and seemed to have stained the boat. As I was doing the hatches I got the idea to go ahead and clean that mess. When I removed the cutting boards it was a mess but not as bad as the first time I removed them….


I went ahead and cleaned the gunk off the gunwale and was amazed at how well acetone cleans up. I went ahead and sanded down and varnished the teak footboards.

And here is a picture of how I sealed that piece of starboard. Sandra said that it was a chemical reaction to the black starboard as to why the gunk oozed out of it. The other recesses were filled with 2” white starboard. So I went ahead applied the 5200 it to cure. I also noticed that it seems as if the 5200 does not adhere to the starboard but still it makes a seal/filler around it and then the cutting board I place over them should keep everything in place. The teak steps also had recesses under them and I did the same procedure.

A few days later I bought down my bandsaw. I had ordered new blades for it and it was ready. I took off the forward rod holders and rounded the “gaskets'' they are held in. See in the picture below how they looked.


In the past I had tried to make gaskets for the midship rod holders using a jigsaw and the results were horrible. I believe I tossed them. Note the midship rod holder on top of the teak step and note the square gasket on the rod holder in the front of the picture? I can’t believe it took me over five years to fix this but on Sunday I finally did it. All because I’ve been injected with making the Causeaican more than just a “fishing machine”. And it seems the more I do, the more I am getting into it. Tonight I ordered a new trailer winch….but that is another chapter…..


Chapter 1>2020-Revamping the Causeaican

Step 1-5/5/2020-Revarnishing the hatches: Where it all begins.


It’s been eight years since I purchased my boat and I’ve gone through a series of adventures and misadventures because of it. I am not going to go over those details at this point. Right now, because of the Covid-19 Pandemic, I am complying with “stay at home” orders. In the meantime urged by Sandra, my girlfriend who is frankly getting on my nerves from having to be cooped up together for so long, I’ve thrown all financial caution to the wind and have begun trying to bring the Causeaican to an acceptable mechanical and cosmetic condition.

I started revarnishing the hatches around December and finally really got serious about finishing the job when we went into the "Stay at Home" phase of the pandemic.

It took me up to the rainy Memorial Day Weekend to sit down and write this blog. It, like the refitting of the Causeican is a work in progress and you will notice I will come back and rework on the chapters as I continue to fix the vessel.

The Hatches:

I picked up on March 16, three months to the day after I left off on December 17 to apply fifteen coats of varnish to my hatches. After that it took me over two weeks to get to this point, I must say that I am 80% satisfied with how they have come out. I used a heat gun to lift the old layers up then began to sand and lay down the varnish coats. I started with 40 grit sandpaper and soon after, got myself a Bauer orbital sander, sanding discs, a rubber sanding block, and 220 sandpaper sheets. I would hand sand using a block and 220 sandpaper in between coats but then started using the orbital sander instead because it was just faster.

The idea of needing 16 coats of varnish was implanted in me by “Boomer”, one of my neighbors in Galway Bay. The previous coats that I applied lasted over three years. This time I used a lighter wood stain by MinWood and the same boat spar. I am satisfied with the result however as I worked on the hatches I was inspired by the YouTube channel “Sailing Delos” and urged by Sandra to work on the rest of the boat. Within a couple of steps I’ve started to try to achieve perfection and I have become quite critical of my work.

This attitude is affecting me at all phases of the jobs I am doing and perhaps upon writing this I would have improved. Mind you, years ago I tried to get the Causeaican in top shape only to realize that I did not have the knowledge, tools, or patience to do a decent job. I only focused on getting her out to sea and now I realize that you need to take your time to do the work and if you want to reach a level of perfection it’s going to take a lot more time and money to get it done “just right”. Although I started this project over two months ago, it was only yesterday after I installed Starboard to cover the holes on the console and not feeling that I had done a good job I began to write my whole experience out.

In the meantime, the hatches need to be “puttied” and ready to be installed as soon as I work on the spider web cracks that have developed under the pilot seat. I’ve started working on two and three phases of the repairs at the same time. Mostly because I don’t have the tools or materials that I think are needed. At this point I am considering purchasing sheets of 600-800-1200 grit sandpaper to use with the rubber sanding block for the spider web cracks....